
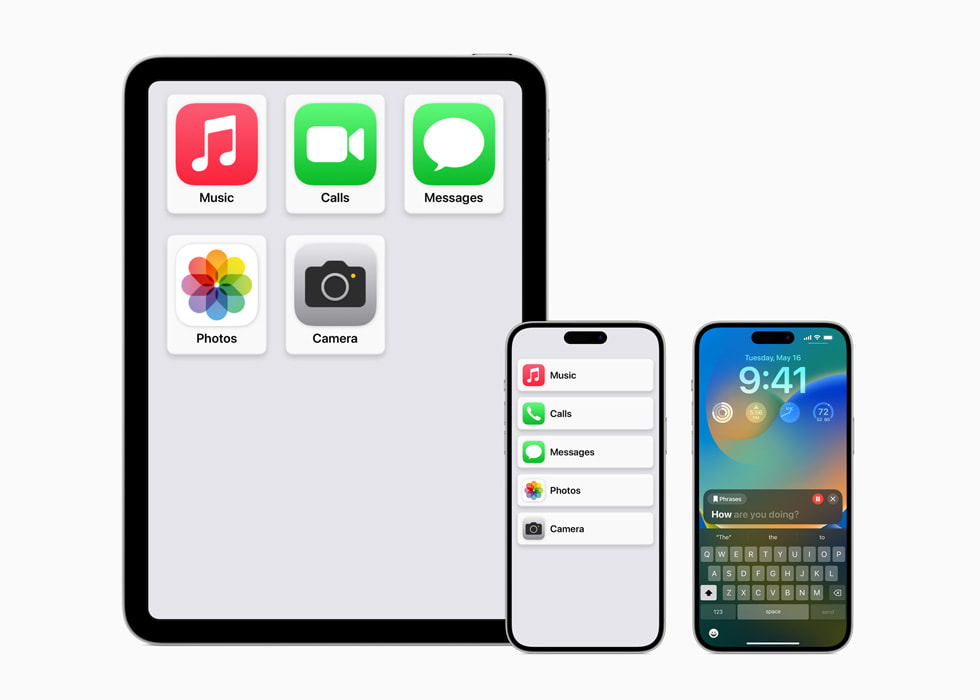
Ever had one of those days where your iPhone just feels like it’s speaking your language? I remember the first time I stumbled upon iOS accessibility features—it was like discovering a hidden superpower tucked away in the settings. Picture this: I’m squinting at my screen late at night, and suddenly, with a few taps, everything gets bigger, bolder, and way more user-friendly. That’s the magic we’re diving into today with “Exploring iOS Accessibility Options.” It’s not just about tech; it’s about making life smoother for everyone, whether you’re visually impaired, hard of hearing, or just need a little extra help. Let’s keep it chill and chat through this like we’re grabbing coffee together.
iOS accessibility options are Apple’s thoughtful toolkit designed to make your device work for you, not against you. In essence, they respond to the question: How can I customize my iPhone or iPad to fit my needs? These features cover everything from screen readers to adaptive controls, ensuring inclusivity without fuss. For instance, if you’re exploring these for the first time, start by going to Settings > Accessibility—it’s that straightforward, turning potential frustrations into empowering tweaks in minutes.
Why iOS Accessibility Matters in Everyday Life
You know, in a world buzzing with notifications and tiny text, accessibility isn’t just a buzzword—it’s a game-changer. I once helped a friend who has low vision set up VoiceOver, and the way his face lit up when his iPhone started describing everything on screen? Pure joy. These options aren’t locked behind complex menus; they’re woven into iOS to promote independence. Think of them as your digital sidekick, adapting to challenges like color blindness or motor difficulties with ease. And here’s a fun twist: even if you’re not dealing with disabilities, features like Reduce Motion can make your device feel less overwhelming, almost like giving it a chill pill.
From a cultural angle, it’s fascinating how iOS pulls from global inclusivity movements. Remember that viral meme about accessibility being the unsung hero of tech? It’s spot on—Apple’s commitment echoes real-world pushes for equality, like how subtitles in videos became a norm post-streaming boom. So, whether you’re in a bustling city or a quiet suburb, these tools bridge gaps, making tech feel personal and approachable.
Essential strategies for iOS securityKey Accessibility Features Worth Trying
Let’s break it down without overwhelming you. iOS packs a punch with features like VoiceOver, which narrates your screen, or Zoom for magnifying details. But it’s not just about visuals; there’s AssistiveTouch for easier navigation if buttons are tricky, and Sound Recognition for those who might miss alerts. iPhone accessibility features even include options for cognitive support, like focused apps that minimize distractions—perfect for anyone feeling scattered in our fast-paced digital world.
To keep things varied, imagine comparing this to a choose-your-own-adventure book. You pick what fits: for hearing aid users, Made for iPhone devices integrate seamlessly, turning your phone into a personalized audio hub. It’s all about that relaxed exploration, where you dip in and out as needed, discovering how these tools can enhance your daily routine.
Step-by-Step Guide to Setting It All Up
Ready to get hands-on? We’ll walk through enabling a couple of popular options, keeping it light and straightforward. Start with VoiceOver as your entry point—it’s like giving your iPhone a voice coach.
1Open the Settings app and tap on Accessibility. It’s usually near the bottom, right next to your profile.
Top ways to transfer data to iOS2Scroll to VoiceOver under the Vision section and toggle it on. Play around with the rotor gestures to get a feel—it’s intuitive once you practice.
3For something like Magnifier, head back to Accessibility > Magnifier, and enable it. Now, triple-click your side button to zoom in on real-world objects—it’s like having binoculars in your pocket!
This isn’t just a tutorial; it’s about building confidence. I’ve tweaked these settings myself during long flights, turning potential boredom into an engaging experiment. Remember, iOS updates often refine these, so check for the latest in Settings > General > Software Update.
A Quick Comparison of iOS Versions
It’s helpful to see how things evolve, right? Here’s a simple table comparing accessibility in iOS 15 versus iOS 17, because who doesn’t love a bit of side-by-side clarity?
Comparing iPadOS and iOS differences| Feature | iOS 15 | iOS 17 |
|---|---|---|
| VoiceOver Enhancements | Basic screen reading with gestures | Advanced AI for more natural speech and custom vocabulary |
| Assistive Access | Limited app simplification | Fully customizable interfaces for cognitive needs |
| Sound Recognition | Available for basic alerts | Expanded to detect doorbells and appliances |
As you can see, newer versions add layers of personalization, making tutorial iOS accessibility even more rewarding. It’s like upgrading from a basic bike to one with all the gears—no extra effort required.
Tips and Tricks for Seamless Integration
To wrap up the exploration, let’s sprinkle in some real-talk advice. Pair accessibility with Siri for voice commands that feel like chatting with a friend, or use the accessibility shortcut for quick toggles. A metaphor I love: Think of these as the seasoning in your tech recipe—they enhance without overpowering. And if you’re sharing your device, the Guided Access feature keeps things focused, preventing accidental swipes during movie nights.
One last nugget: Experiment in safe spaces, like during a lazy weekend, to avoid any initial hiccups. It’s all about that relaxed vibe, turning what could be technical into something genuinely fun and empowering.
FAQ: Quick Answers to Common Questions
What is VoiceOver and how does it work? VoiceOver is Apple’s screen reader that describes what’s on your iPhone screen aloud. It uses gestures to navigate, making it ideal for blind or low-vision users—simply enable it in Settings and practice the basics for a smooth experience.
Ideas for creating iOS widgetsCan I customize accessibility for multiple needs? Absolutely! iOS lets you combine features, like enabling both larger text and color filters, to tailor the device to various requirements. It’s flexible, so adjust as you go for the best fit.
Is there a way to test these features without committing? Yes, try the Accessibility Simulator in Xcode if you’re a developer, or just toggle options on and off in Settings to see real-time changes—it’s a low-pressure way to explore.
As we ease out of this chat, imagine the possibilities when your iPhone truly adapts to you—what new adventures might unfold? Keep tinkering, and who knows, you might just unlock a feature that changes your day.